
Web accessibility is an important part of the development process that should be considered with your initial course design. It is a “best practice” for your e-Learning presentations to be compliant with Section 508 of the Rehabilitation Act. As described in the 508 Standards Guide [1194.22(b)]:
“Equivalent alternatives for any multimedia presentation shall be synchronized with the presentation.”
Lectora® and Lectora® Online make it easier to comply with Section 508 requirements as well as conform to Level AA of the Web Content Accessibility Guidelines 2.0 by including closed captions within your titles.This blog will show you step by step how to create and add closed captions to Lectora and Lectora Online titles. For more information, visit the Information Center (a.k.a. Help), located inside Lectora, for topics on “Working with closed-captioning”.

Part I: How to Add Closed Captions to Video FilesStep A: Insert Your Video File into Lectora/Lectora OnlineOpen your title in Lectora/Lectora Online. Locate and drag the desired video file into your title, or alternatively, from the Insert ribbon, select Insert Video File. Browse for and select the desired video file.

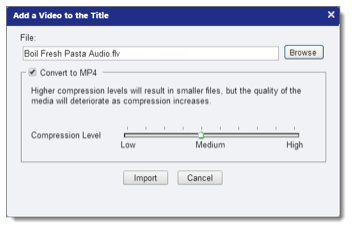
Lectora and Lectora Online support adding captions to FLV and MP4 video formats. If your file is not in this format (for example, WMV or AVI), you will need to convert it to MP4. You can convert it as you import it with Lectora Online. In Lectora desktop, double-click on the video on the page (or in the Title Explorer) to switch to the Video Properties ribbon. Click Convert to MP4.

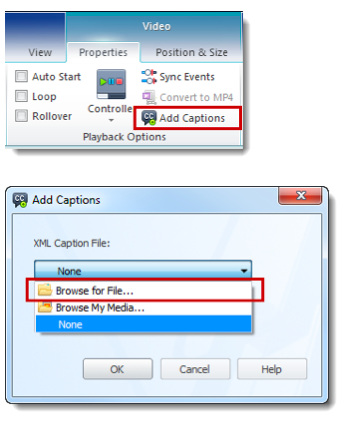
Step B: Create Your Caption FileLectora requires a specially formatted XML file in order to attach captions. There are a couple of different ways to create your caption file. You can easily create it yourself, or use a 3rd party service (such as 3PlayMedia). To create a caption file, click Add Captions on the Video Properties ribbon.

On the Add Captions dialog, click the button to see a Sample XML File:

The sample XML file has all of the required formatting contained within it. You simply need to change the text of the captions, and set the timings of when your text will appear and disappear. The sample has three parts: Header information, Text Styling information and the Body (caption text). Let’s look at each part of the sample:

2. Text Styling: This sample is set up to allow for two different styles for text: “normal” and “warning”.
“Normal” is set to a font size of 15 pt, and the default closed caption color of white, while “Warning” text will display in red, bold, and 20 pt. You can leave these as is, or change them as you wish. (Note: colors are set using HEX values. Here is a handy color chart.)

As you will see below, for each line of text in your caption you can determine whether to use the “normal” style or use the “warning” style. (Or define your own style by copying the “warning” line and renaming the style id.)
3. Body (caption text): This is where you enter the specific text and timing for your video file.

3a. Each paragraph of text that you want to appear starts with the tag of <p begin= and ends with </p>. You simply copy/paste to repeat this information as many times as needed for all of the text in your file.

3b. For each paragraph, start by setting the timing of when you want this text to appear (begin=) and disappear (end=). The format is HH:MM:SS - Hours:Minutes:Seconds. You can also indicate tenths and hundredths of seconds, if needed.

3c. Next, identify which of your defined text styles each paragraph should use. Simply change the style= value to the desired style id.

3d. Finally, add any special formatting such as line breaks <br/> (to force multiple lines in this caption) or perhaps apply a text style to span a specific word or phrase within a caption.

In the sample above, you can see there will be a line break after the word “line”, and the number “17” will appear in the “warning” (red, bold) text style:

Step C: Save Your Caption File and Add It to Your VideoWhen you have finished making all of your edits to create your caption file from the sample, remember to save it! Using Lectora desktop, select File > Save As and name the file appropriately. Change the file extension to .XML. Using Lectora Online, simply click Save To Title.

On the Video Properties ribbon select Add Captions. Browse for and select the XML caption file that you created.
Step D: Preview & Publish Your Video with CaptionsEnter Run or Preview mode. Play your video and make sure that the closed captions appear.

Part II: How to Add Closed Captions to Audio FilesLectora 11 and higher supports adding closed captions to FLV and MP3 audio files using the same steps as for video above: insert the audio file, and then on the Audio Properties ribbon select Add Captions.

Again, you may need to use Convert to MP3 to change your audio file format (for example, from WAV or WMA).

This process will also be true when Lectora Online 2.1 is released!However for now, to add captions to an audio file in Lectora Online 2.0, you have to trick it into thinking the audio file is a video file.Step A: Convert your audio file to video.There are several ways you can convert your audio file to a video file:
Now that your file is in a supported video format, you can insert it into your title and add captions just as you would for a true video file.Step B: Preview & Publish Your Recording with CaptionsResize your video object on the page to ensure it is tall enough to view the closed captions.

Enter Run or Preview mode. Play your recording and make sure that the closed captions appear.To try adding closed captions to video and audio files in Lectora or Lectora Online, sign up for a free 30-day trial.Subscribe to the Lectora e-Learning Blog for more how-to tutorials and helpful tips.
.svg)
